How to Edit AI Images Without Starting Over
Learn how to edit AI images: fix one detail, remove objects, and expand the frame without redoing the whole picture. Simple steps and a checklist.
Quick answer: To edit AI images without starting over, match the tool to the problem. Use Retouch to refine details, Remove to take out distractions, Expand to extend the canvas, Edit prompt to clarify your instructions, and Regenerate only when the whole composition needs a new start. Change one thing at a time, then check the edited area at full size before you export.
Most image problems are small. A stray object sits behind your subject, a hand looks odd, or the frame is a little too tight. The mistake is to throw the whole image away and generate it again. A new generation can fix the flaw, but it can also lose the lighting, pose, or mood you liked. Precise editing keeps what works and changes only what does not.
This guide explains how common editing tools differ, how to describe a change so the result blends in, and how to build a revision routine that cuts wasted attempts. The step-by-step section uses Dreamina as its example, and the same logic applies to most AI image editors. The guide also covers a use case that many guides skip: editing product photos honestly.
What is the difference between image generation and image editing?
Image generation creates a complete picture from a text prompt, and sometimes from a reference image too. An AI image generator from text builds the first version. Image editing then changes part of a picture that already exists. Many tools offer both in one workspace, so you can generate a base image and refine it without leaving the page.
Keep one limit in mind. A local edit can still affect nearby pixels, so no AI editor can promise that everything outside your selection stays identical. That is why you check the edges and surroundings after every change, and why choosing the right operation matters more than writing a longer prompt.
Which AI editing tool fixes which problem?
Start with the symptom, then pick the tool. This table covers the main options. Names and controls can differ by interface and version, so check what your own workspace shows.
Problem | Best tool | What to watch for |
|---|---|---|
Small flaws or soft details | Retouch | Describe what to keep, so the subject still looks like itself |
Unwanted object or person | Remove | Check that the filled area matches nearby texture |
Frame is too tight | Expand | Say what belongs in the new space |
Result is close but not right | Edit prompt | Change one instruction, not the whole prompt |
Composition does not work | Regenerate | Expect a new result, not a small tweak |
Low detail or resolution | Creative upscale | It improves quality but does not fix layout or objects |
Practitioner's tip: Upscale last. If you upscale first and then remove or expand, you may repeat work, and any flaw in the image gets sharper along the way.
What are the six principles of a controlled image edit?
Clear instructions give the model less room to guess. Use these six habits:
Set the edit boundary. Name the exact object, area, or feature to change. "Fix the image" is too broad. "Change only the mug on the table" is clear.
State what must stay the same. Mention nearby colors, textures, and shapes that should not change.
Describe the replacement. After you remove something, say what should appear instead, with enough detail to picture it.
Match the environment. Describe the light direction, perspective, and background material so the edit blends in.
Pick the right operation. Removal, retouching, canvas expansion, and regeneration solve different problems.
Check before you export. Look at edges, shadows, textures, and the seam between edited and untouched areas.
Example: weak prompt versus strong prompt
Weak: "Remove the sign and make it look nice."
Strong: "Remove the street sign behind the person's left shoulder. Fill the area with the same red brick wall, and keep the warm evening light from the right."
The strong version names the object, its location, the replacement, and the lighting. Each detail removes one guess.
Before you start, pick the tool that matches your problem, using the table above. Menu names vary by tool and version, so check your own workspace first.
How do you edit an AI image, step by step?
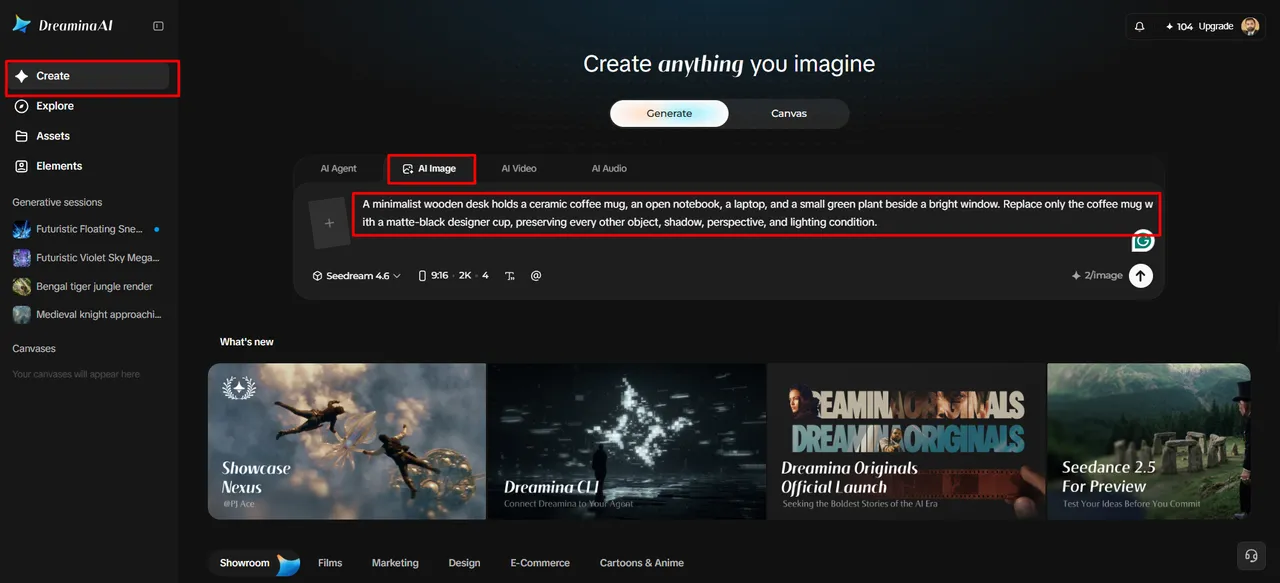
Step 1: Start Your Project With a Clear Prompt
Sign up or log in to Dreamina to open your editing workspace.
Go to the "Create" tab in the left menu and click the "AI Image" option.
Enter a detailed text prompt that describes exactly how you want the image to look.
Mention image elements, theme, and concept so the base image needs fewer changes later.
Step 2: Set Your Controls Before Generating
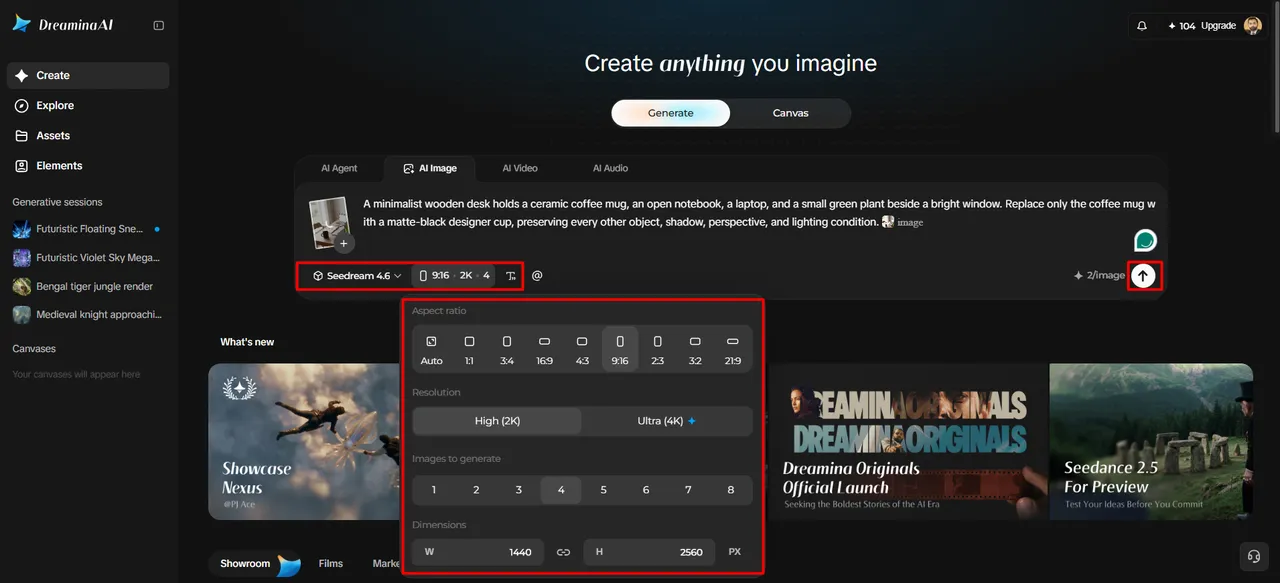
Choose an image model from the options at the bottom of the dialogue box.
Pick Seedream, GPT Image, or Nano Banana depending on the result you prefer.
Provide a reference image to help Dreamina produce a more precise and natural image.
Adjust the "Aspect ratio" and "Resolution" tabs to fit your project needs.
Choose how many drafts to compare through the "Images to generate" tab.
Fine-tune the size of your image using the "Dimensions" tab.
Use the "Draw text on image" tab when your design needs written content.
Click the "Generate" tab to start the creation process.
Step 3: Edit Only the Parts That Matter
Dreamina gives you the required number of drafts, so examine each one closely.
Choose "Edit prompt" or "Regenerate" if the generated results fall short.
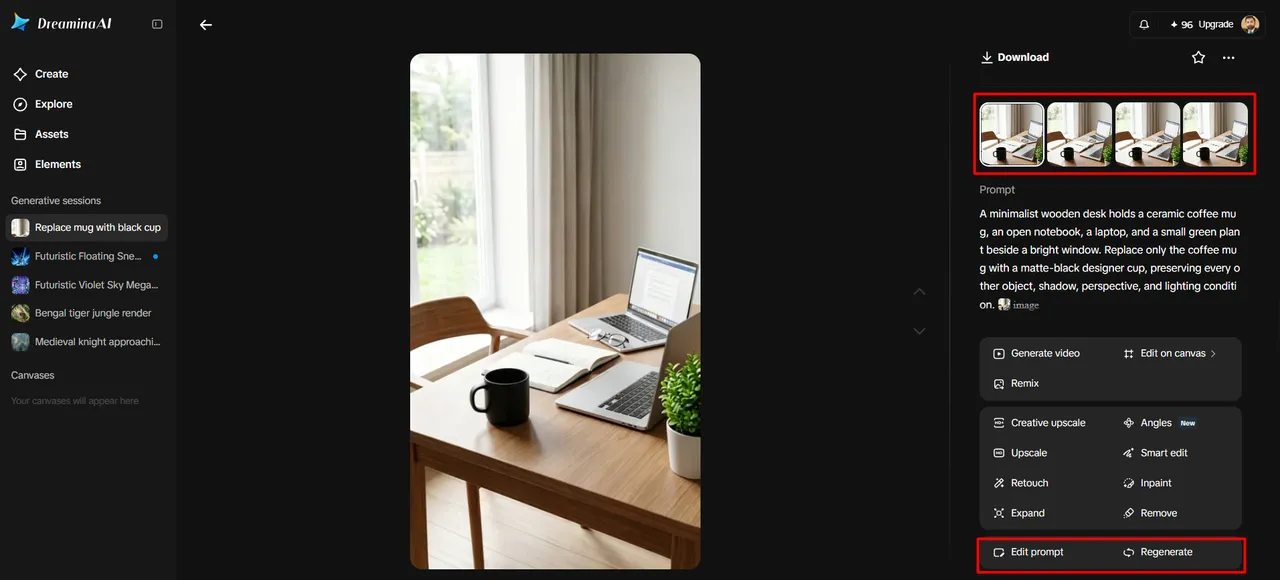
Enlarge details in your selected draft with the "Creative upscale" option.
Click "Retouch" to correct, clean up, or enhance details of the selected image.
Select "Remove" to take anything out of your image without touching the rest.
Use the "Expand" tab when you want to extend your image beyond its borders.
If you want to generate a video of the generated image, you can use the "Generate video" tab
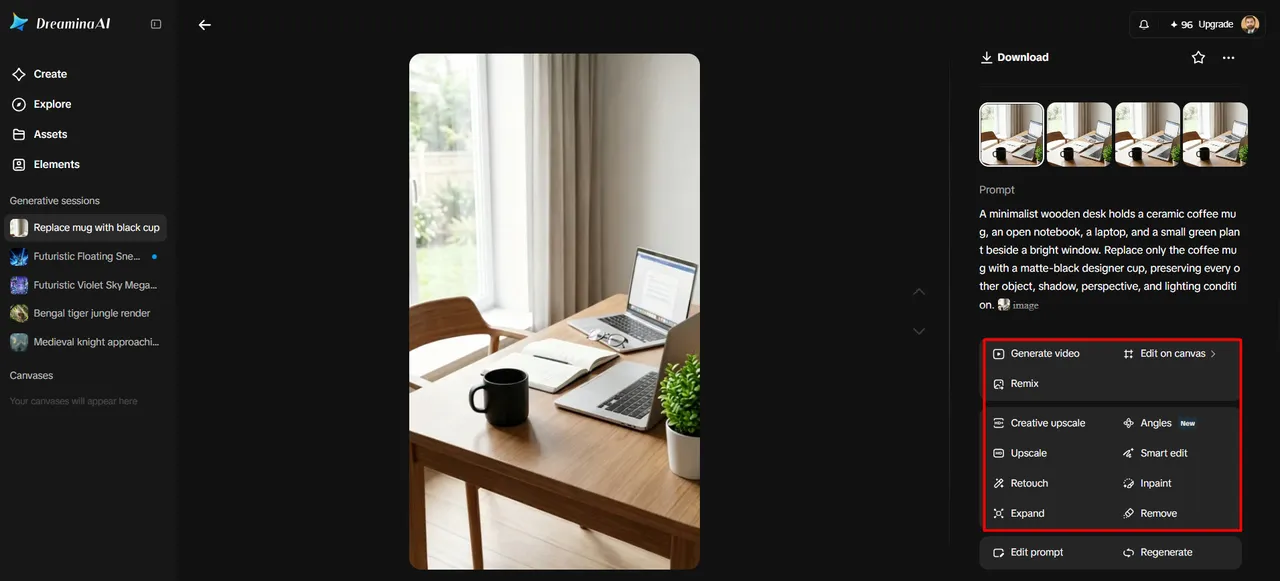
Dreamina gives you complete freedom to edit your image the way you like.
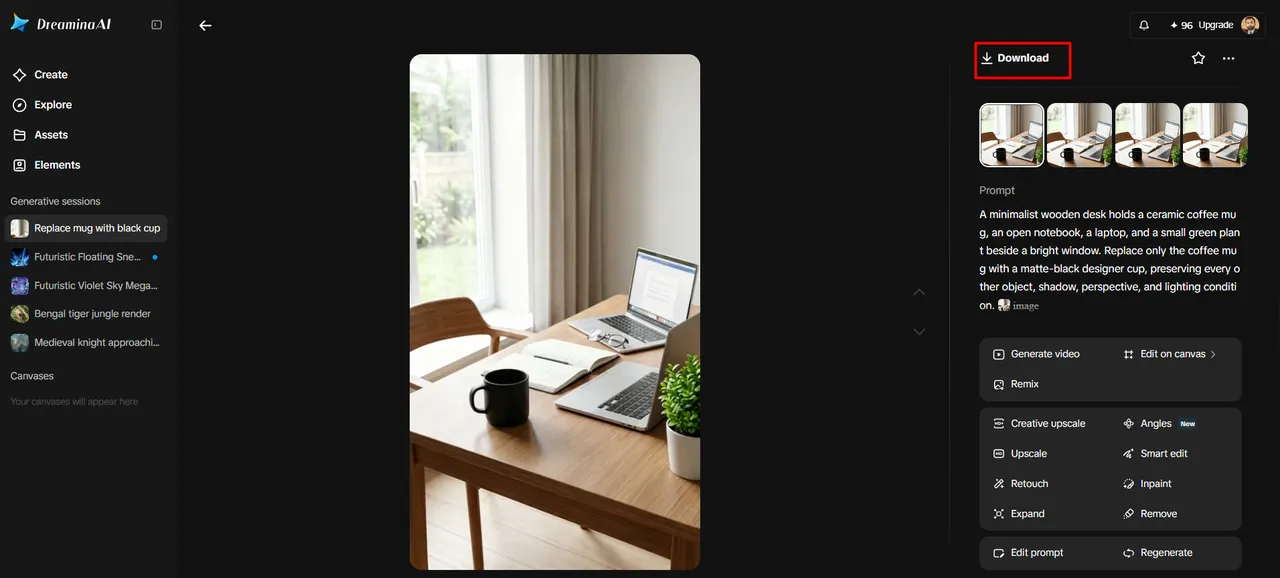
Click the "Download" tab at the top right to save the video file on your local device.
Dreamina offers daily free credits, which is useful for trying edits. Limits, models, and prices change for every tool, so check the current plan before you build a workflow around it.
How do reference images improve editing precision?
Words cannot always describe a texture, a hairstyle, or a lighting mood. A reference image shows it directly. Where the tool allows it, you can also mark the exact spot with a selection or brush, a simple arrow, or a rough sketch of the layout.
Use a reference for clothing, hair, lighting, or background style.
Use a sketch to show placement and proportion.
Use a brush selection to limit the edit to one area.
A reference guides the result. It does not guarantee an exact copy, especially for fine patterns, small text, or complex objects. Treat the first result as a draft.
How do you fix backgrounds, objects, and small details?
Backgrounds
Describe the new setting and how it relates to the subject's light. A sunny beach behind a person lit by a soft indoor lamp will look pasted on. Say "soft window light from the left" and the scene is easier to match.
Unwanted objects
Brush only the distracting object, not a wide area around it. Wide selections force the tool to invent more, which raises the chance of odd textures. After the edit, check for gaps, repeated patterns, and blurred patches.
Clothing, hair, and visible items
Say what should change and what should stay. For example, change the shirt colour but keep the folds and the person's pose.
Lighting
After any lighting change, look at shadows and highlights near the edit. A bright patch with no matching shadow is a common giveaway.
Expanding the canvas
Explain what belongs in the new space, such as "more sky and a distant hill." Check reflections, repeated textures, and tiny artefacts near the seam. Complex overlaps, see-through materials, and busy backgrounds often need several tries.
What is a fast revision workflow?
Work from the smallest fix to the largest. Each step costs more effort and carries more risk than the one before it.
Fix the single most obvious error. Do not stack several edits at once, because you will not know which one caused a new problem.
Try a local tool. Use Remove or Retouch for the flaw.
Clarify the prompt. If the local result is close, edit the instruction.
Regenerate only if needed. Choose this when the composition, pose, or layout is wrong.
Save versions. Keep the last good image so you can go back.
Review at full size. Check the whole image, the edges, and the export quality.
If a problem keeps returning, make another targeted change. Do not rebuild a composition that was already good.
How should small businesses edit product photos honestly?
AI editing is handy for tidying a product photo: removing a stray cable, extending a background for a banner, or cleaning up lighting. Packaged food, supplements, and cosmetics need extra care, because buyers rely on what the photo shows.
Never edit label facts. Do not change dates, ingredients, weights, or warnings with Retouch, Remove, or text tools. Altering them can mislead buyers and may break the rules for selling those goods.
Keep a clear, unedited photo of the real label. Use it as your record, and use the edited image only for presentation.
Disclose AI use where it matters. Google's guidance on generative AI content notes that sharing how content was created gives readers context. For shopping listings, it also says Merchant Center requires AI-generated images to carry specific metadata, so check the current rules before you publish product images.
Track real stock separately from pictures. Good photos sell a product, but fresh stock keeps customers safe. A tool like Expirel lets you log batch expiry dates, scan items with the barcode scanner, and share one list with your team through its business features.
Common mistakes when editing images with AI
Regenerating too early. You lose the parts you liked.
Writing vague instructions. "Make it better" gives the model nothing to aim at.
Editing too much at once. You cannot tell which change broke the image.
Ignoring the light. Mismatched shadows are the fastest way to spot a fake edit.
Upscaling too soon. You may repeat the work and sharpen flaws.
Skipping the full-size check. Small artifacts hide in a zoomed-out view.
Checklist: before you export
The edited area matches the light and color of its surroundings.
Edges and seams look clean at full size.
Textures do not repeat in an obvious pattern.
Hands, faces, and text are correct.
Nothing misleading was changed on a product, label, or document.
You saved the last good version.
The bottom line
To edit AI images well, name the problem, pick the matching tool, and check every change. Small, targeted edits protect what already works. When the composition fails, regenerate. When only a detail fails, fix the detail.
Frequently asked questions
Q: Can AI edit one part of an image without changing the rest?
Yes, tools such as Remove, Retouch, and interactive editing target selected areas. Surrounding pixels can still shift slightly, so check the edges after each edit.
Q: How do I remove an object from an AI image?
Open the Remove tool, brush over only the object, and run the edit. Then check that the filled area matches the nearby texture and light.
Q: How do I extend an image beyond its borders?
Use Expand, and describe what should appear in the new space. Review the seam for repeated textures and mismatched light.
Q: What is the difference between Edit prompt and Regenerate?
Edit prompt refines the instruction for a result that is close. Regenerate creates a new result, so use it when the composition itself is wrong.
Q: Are AI image editors free to use?
Many offer limited free credits and paid plans for more. Dreamina, for example, has offered free daily credits. Plans change, so check the current terms in the app.
Q: Should I tell people when I use AI to edit an image?
For product photos, news, or anything where accuracy matters, yes. Google's guidance says explaining how content was made helps readers, and shopping platforms can require specific metadata for AI-generated images.

Fahad Ahmad
Founder of EXPIREL · Digital Entrepreneur · Product Management Specialist
Fahad Ahmad is the founder of EXPIREL and a digital entrepreneur with over 10 years of experience in SaaS development, SEO, and digital product creation. He focuses on building practical solutions that help individuals and businesses manage product expiration dates, organize inventory, track habits, and improve daily productivity.
Through EXPIREL, Fahad shares actionable guides, product management tips, barcode scanning tutorials, and research-backed insights designed to help users reduce waste, stay organized, and make smarter decisions.
Related Articles
View all
The Benefits of Automating Routine Tasks in Research Laboratories
October 13, 2026
Learn how automating routine tasks in research laboratories saves scientist time, improves consistency, and cuts errors. Includes a simple framework to start.

11 Best Social Media Productivity Tools to Save Time in 2026
October 12, 2026
Compare 11 social media productivity tools for 2026 that save time on routines, scheduling, design, automation, video, analytics, and link tracking.

Best Productivity Apps for Medical Students in 2026: Pick by Stage
October 9, 2026
Find the best productivity apps for medical students in 2026: free picks, a stack for each stage, tools for doctors, and how to protect patient privacy.